Introduction: The Quiet Architects of the Digital Age
The technology industry is notoriously volatile, a landscape defined by the “flash-in-the-pan” success of startups that burn brightly for eighteen months before vanishing into the digital graveyard. In an era where apps and platforms cycle through relevance at breakneck speed, there is something profoundly counter-cultural about an infrastructure provider that has not only survived but thrived since the dial-up days of 1997.
Systron Micronix represents a rare breed of “quiet architects.” I’ve watched this industry evolve from the mechanical clatter of SATA III hard drives to the silent, blistering speed of NVMe SSDs, and very few firms have managed to bridge that gap. While the front-facing web has undergone dozens of stylistic revolutions, Systron has remained in the trenches, evolving from a pioneering enterprise in Central India into a global powerhouse managing complex clusters for a clientele spanning the USA, UK, and Europe.
The central curiosity for any digital strategist is simple: How does a company founded nearly 30 years ago—an eternity in tech—continue to win “Most Innovative” awards in the 2020s? The answer lies in a strategic evolution that prizes high-tech infrastructure as much as high-touch partnership.
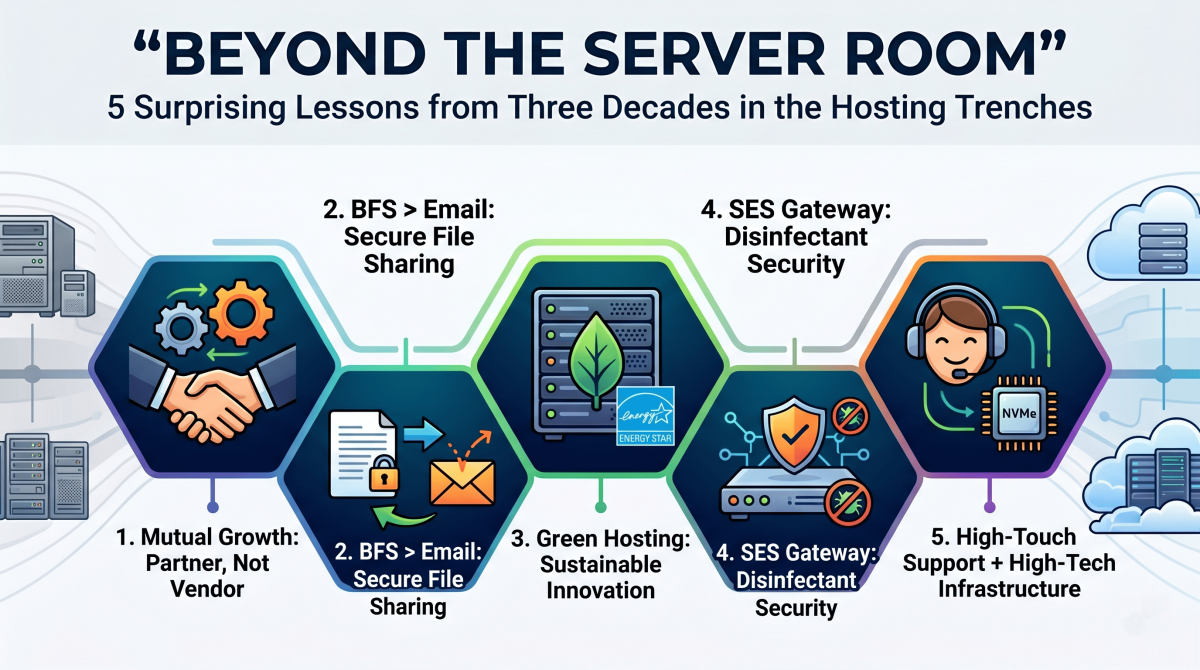
1. The 30-Year Survival Secret: It’s Not Just About Hardware
Longevity in the hosting world is often mistaken for a mere hardware race. However, the internal journey of Systron Micronix reveals that while hardware is a commodity, philosophy is the true differentiator. Their “Customer First” model shifts the vendor-client dynamic from a simple transaction to a “Mutual Growth” model, where the host acts as a strategic business partner rather than a faceless offshore provider.
“We are always on toes to provide our clients with the best possible solution with quality. The next target would be to maintain, sustain and reach the next level.”
In the modern cloud era, many organizations treat hosting like a utility, similar to electricity. This is a mistake. A “business partner” approach ensures that as a venture scales, the infrastructure isn’t just “available”—it is optimized and upgraded at no additional cost. For a strategist, this alignment of technical infrastructure with commercial objectives is the only way to ensure long-term technological resilience.
2. Why Your Email is Failing You (and the BFS Fix)
One of the most surprising technical lessons from the hosting trenches involves the hidden fragility of our most basic tool: email. While standard protocols like SMTP and POP3/IMAP4 have governed communication for decades, they are increasingly unfit for modern demands. We’ve all seen the failure mode: a professional attempts to send a critical 50MB file, only to have it “bounce” because the recipient’s mailbox quota is full. This doesn’t just block the message; it often floods the sender’s own mailbox with error logs, creating a digital bottleneck.
To solve this, the transition toward a purpose-built Business File Sharing System (BFS) has become business-critical. By utilizing HTTP/1.1—a more researched and reliable protocol than legacy SMTP—Systron provides a platform for secure movement of documents with a level of accountability essential for Medical Transcriptions, BPOs, and legal firms.
The Strategic Advantages of BFS:
- Protocol Reliability: Leverages built-in FTP features within HTTP/1.1 to bypass the instability of mail attachments.
- Auditability: Maintains “online records of movement” with recorded upload/download statistics, crucial for compliance and audits.
- Administrative Control: Admins can manage all file movement, set individual privileges, or suspend access without deleting content.
- Zero Footprint: A web-based application requiring no client software, ensuring transparency across geographically dispersed teams.
3. The “Green Server” Revolution is Hiding in Plain Sight
While the hosting industry is often criticized for its high energy consumption, long-term players are leading a “Sustainable Innovation” movement. This isn’t just about corporate optics; it’s about the future of global environmental stewardship and helping clients meet their own “Scope 3” emissions reporting targets.
Sustainable Innovation Initiatives:
- Green Servers: Implementation of energy-efficient server architectures and low-carbon computing.
- Virtualization Optimization: Dynamic resource allocation to reduce the physical hardware footprint.
- Energy-Efficient Equipment: Rigorous selection of ENERGY STAR certified components.
- Renewable Exploration: Strategic investment in carbon-neutral technology and sustainable power solutions.
By focusing on “Renewable Exploration,” infrastructure providers are proving that digital transformation can be decoupled from environmental degradation. For the modern entrepreneur, choosing a green host is no longer a luxury—it is a strategic alignment with a global low-carbon economy.
4. Security isn’t a Feature—It’s the Foundation
In the 90s, security was an “add-on.” Today, it is the foundation of the entire stack. Systron Micronix has distilled this into a multi-layered defense featuring Acronis Cyber Backup, SiteLock, and CodeGuard.
The SES acts as a sophisticated internet gateway that does more than just block intruders. It handles the “distribution of cleaned and disinfected mails” before they ever hit a client’s intranet. By acting as a disinfectant gateway, it prevents “unscrupulous intrusion” while allowing organizations to restrict general internet access without sacrificing connectivity.
Perhaps the most impactful shift is the democratization of these tools. By offering Acronis Cyber Backup, enterprise-grade disaster recovery is now accessible to small businesses. When you contrast this nominal daily cost against the catastrophic expense of a data breach or an intrusion, the value proposition shifts from “IT expense” to “business insurance.”
5. The Award-Winning Paradox: High-Tech Meets High-Touch
The hosting industry is currently caught in a paradox: as technology becomes more sophisticated, the human element is being automated out of existence. Systron Micronix has won consistent accolades by leaning into the opposite direction. Their recognition includes:
- 2018: Most Trusted Web Hosting Company (Software & Technology Awards).
- 2019: Most Outstanding US Web Hosting Company (Global Business Insight Awards).
- 2021: Hosting/Colocation Innovation of the Year (SDC Awards).
- 2022: Most Innovative Web Hosting Company (Acquisition International).
The secret to beating modern competitors lies in pairing “High-Tech” (leveraging AMD EPYC and Intel Xeon processors with Managed NVMe SSDs) with “High-Touch” (their 24/7 “Expert Help” support model). In a world of faceless cloud giants and automated bots, having access to senior technical expertise at any hour is a strategic asset that minimizes downtime and maximizes operational efficiency.
Conclusion: The Future of Your Digital Identity
After nearly thirty years in the hosting trenches, the final lesson is clear: infrastructure is no longer a commodity; it is a strategic asset. Whether it is through carbon-neutral “Green Servers,” specialized file-sharing systems like BFS, or the “disinfectant” gateway of an SES server, the choice of a partner determines the resilience of your digital identity.
As we move further into this era of digital transformation, every business leader must ask: In an era of automated, faceless cloud giants, is your current hosting partner working for your mutual growth, or just charging for your data?