If you think moving your WordPress website to us can be a daunting and stressful experience, but it doesn’t need to be If you follow this A Step By Step Guide.
You are welcome to move your WordPress sites to us as you could be facing several issues from bandwidth crunch to server performance with your current Host. But all too often, you could think migrating to a more reliable host like us is delayed time and again for fear of making a mistake and damaging your site(s). This can be taken care by following this Step by step guide.
If you spend a little time preparing your own website, migrating is nothing to be concerned about. It can be a very straightforward project if approached correctly and can easily be reversed out of should any problems occur.
Let’s run through the steps required to move your WordPress website to a new host.
Step 1: Back Up All Your Website’s Files
The very first step of any project such as this is to back up every aspect of your site. This step is good practice before any major change but it is also a requirement of migrating your WordPress installation.
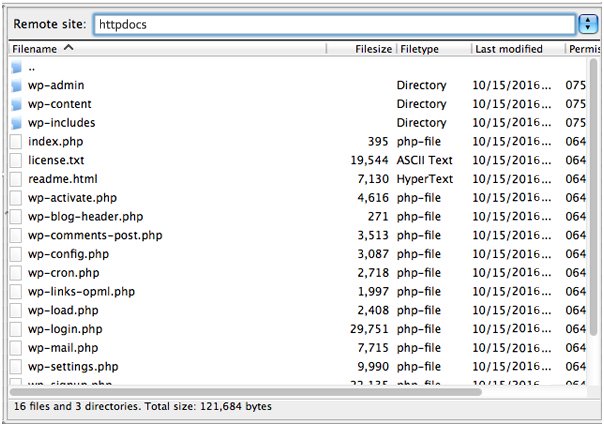
There are many plugins out there that will completely backup your site for you. This backup however, requires a more manual approach. Using an FTP program, connect to your web host and copy all files under your website’s directory to a folder on your local computer.
This includes the .htaccess file that is set to be hidden. Consult your FTP program’s help file to have it display hidden files if you are unable to see this file.
Depending on the number of media uploads you have in your site, this could take some time. While this download is underway you can begin step two and make a copy of your database.
Step 2: Export WordPress Database
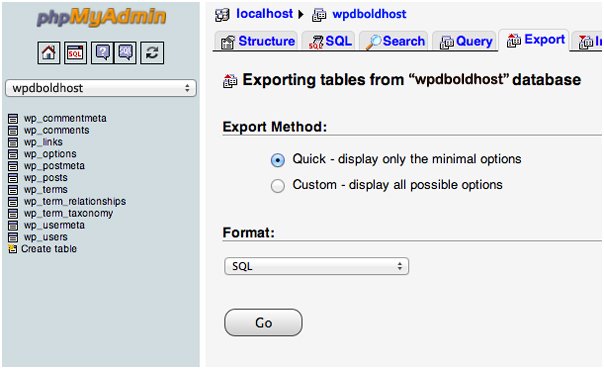
Exporting your database is a simple process that only requires a few steps to complete. Login to the Plesk Control Panel or cPanel account of your web server and open the Db Admin/ phpMyAdmin application. Select the database that contains your WordPress installation from the list on the left hand sidebar and once selected click on the Export tab on the navigation menu.
The default settings of a Quick export and the SQL format for the export are sufficient for what we need. Click the Go button and the database export process will begin and a file will be downloaded to your local computer.
Once the database export and the FTP transfer of your files have both completed, you are ready to move onto the next stage.
Step 3: Create WordPress Database On Your Systron Hosting Server
Before you can begin the migration to Systron Webservers, you need to create an environment for a WordPress installation. To do this you must create a database that you can import your SQL data into.
Login to Plesk or cPanel Control panel. Go to your MySQL Database link.
- Create a new database with an appropriate name for your website.
- Create a new MySQL user (with a secure password).
- Add this user account to the new database and grant it All Privileges.
Write down the database name, the new MySQL username and its password. You will need them soon.
Step 4: Edit your wp-config.php File
Browse to the folder on your local computer where you downloaded your website files to. In that folder there is a file called wp-config.php that controls the access between WordPress and your database.
Make a copy of this file and store it in another folder on your local computer. This is necessary for restoring the changes we are about to make should something go wrong later.
Open the original version of the file with your favorite text editor and make the following three changes:
- Change the Database Name
Locate the following line:
define(‘DB_NAME’, ‘db_name’);
The db_name portion of this line will currently be set to the MySQL database name of your old web host. This must be changed to the name of the new database you have just created on Systron Hosting Servers.
- Change the Database Username
Below this you will find the line:
define(‘DB_USER’, ‘db_user’);
In this line you need to change the db_user portion from the username of your old host to match the new username you have just created.
- Change The Database User Password
Finally, edit the third line:
define(‘DB_PASSWORD’, ‘db_pass’);
As with the others the db_pass section of this line must be changed to the new secure password you created for your MySQL user.
Save wp-config.php and close the file.
Step 5: Import WordPress Database
Now that you have a new database to work with we can begin the import process.
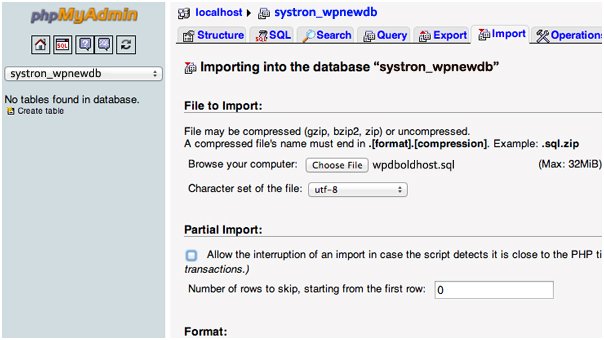
Launch Db Admin / phpMyAdmin from the Plesk or cPanel software on your new Systron server and select your new database from the list on the left hands sidebar. Once it opens select the Import tab from the navigation menu.
In the File to Import section click the Choose File button and select the SQL file you exported previously.
Un-tick the Partial Import check box, make sure the format is set to SQL and then click the Go button. The database import will now begin.
The time this import takes varies depending on the size of your database. You should receive a message informing you of the success of the import when it has finished.
Step 6: Upload Your WordPress Files To Systron Hosting Server
Now that you have the new database prepared and you’ve reconfigured the wp-config.php file, it is time to begin uploading your website’s files.
Connect to your new web host using your FTP program and browse to the folder that your website is going to be held. If this is the primary, or only site being installed on this web server then uploading the files to the httpdocs in plesk or public_html in cpanel folder is the usual directory.
With the remote directory selected you can upload your website files that should now include the updated version of wp-config.php. As with the earlier download, this process can take some time.
Don’t delete these files from your local computer once the upload finishes. They are still needed until the final steps have been completed.
Step 7: New URL, Defining New Domain & Redirection Setup(Optional)
One issue people always seem to have when moving their site is that they’ve added links to other posts on their site or inserted images directly by pointing to a URL on the server, causing these to break when moved over to a new domain. If you want to quickly and easily search for any instances of your old domain name and replace with the new name We suggest you take a look at the Search Replace DB script on github. This will allow you to do this with great ease. Just make sure you DELETE it when you are done (for security reasons).
Make sure you are running the search and replace on the new domain you are transferring the site to not the old one.
Changing Site URL: By doing a search and replace for the old domain and replacing with the new domain you’ll also be altering the site_url and home url values in the database which will ensure that when you try to log into your site on the new domain it doesn’t try and redirect you over to the old domain.
Redirection setup
To transfer your old domain’s SEO to the new one, it’s important that you set up a 301 redirect as follows:
You can use default .htaccess WordPress file:
# BEGIN WordPress
IfModule mod_rewrite.c
RewriteEngine On
RewriteBase /
RewriteRule ^index.php$ – [L]
RewriteCond %{REQUEST_FILENAME} !-f
RewriteCond %{REQUEST_FILENAME} !-d
RewriteRule . /index.php [L]
/IfModule
# END WordPress
To update your permalinks, go to Settings > Permalinks, select the permalinks structure which you want and Save Changes.
Step 8: The Final Step: DNS update
This step actually includes two separate things with (potentially) several days between them.
Before you can use the site on your new host you will need to reconfigure your domain’s DNS settings. They will be set to point to your old host and you will need to point the correct records to the new server IP address.
This process will depend on where you have your domain registered. The details of completing this process are too varied to discuss in this post, but your domain registrar should have all of the details you need to make this change.
DNS changes can take up to 24 hours to fully propagate. It’s best to do this at a period when you expect lower levels of traffic. During this 24 hour window you should avoid making any changes to your website as you may be changing the old version of the site.
Additional Tips:
- Inspect Caching Plugins: Some caching plugins may modify your .htaccess or create a new .htaccess file to absolute paths that may not exist on your new hosting setup.
- Google reCaptcha Plugin: If you have any Google reCaptcha plugins installed, get the new API key for your domain, so that you will not find any difficulty in displaying the reCaptcha.
- Other Plugins : Some plugins also creates issues owing to various reasons including absolute path, memory restrictions etc, You can disable/enable or delete/re-install after proper backup.
Wow! Now, you have successfully completed the migration.


